
You've got questions? I've got answers!
Please include a CORRECT email address if you would like a personal response to
your questions as well.
Revisions and additions are in RED
.
You've got questions? I've got answers!
Please include a CORRECT email address if you would like a personal response to
your questions as well.
Revisions and additions are in RED
.
What primer do you use on vinyl kits?
- Primer is a good thing, but used improperly, it can be your worst nightmare.
I hardly ever use primer on vinyl kits and I guess this started because of my
own ignorance. You see, when I painted my first few vinyl kits, I didn't know
that kits needed to be primed. I do not even think that I washed them. It
wasn't until I got Geometric's resin Pumpkinhead that I realized some
basecoat of primer was needed because my acrylic paint kept beading up on the
slick resin. I still have those un-primed vinyl kits today and the paint looks
as fresh as the day it was sprayed. Primer gives the paint something to bite
into. Most vinyl kits are 'rough' enough for paint unless a heavy mold release
has been used causing the parts to feel 'greasy.' I wash all my vinyl kits in
soapy water first. If I feel the need to prime one, I mistFloquil
figure primer on them. I do not coat them in primer because Floquil is an
enamel based primer. Enamel based paints are a no-no because some kind of funky
chemical process causes oils to leech out of the vinyl causing the paint not to
dry. Since I can't find Floquil now, I recommend Armory Light Gray Figure Primer.
This stuff sprays on smooth and dries quick. It is also a great shade of gray for
putting skin tones on top of.
How do you fill pinholes?-
Pinholes and air bubbles have plagued many resin kits. Vinyl kits have them too
but they are few and far between on vinyl. What I use to fill them depends on
how big they are and how many there are. For really large air bubbles, I will
fill the hole with Milliput or plumber's putty. For medium to small size holes,
I use superglue. I just squirt superglue into the hole and spray it with
kicker. Kicker is a product that speeds up the chemical reaction in superglue
causing it to dry instantly. If the surface of the kit looks like it has been
hit with a shotgun - lots of tiny pinholes, close together, over a large area,
I use Squadran white putty and fingernail polish remover. I will spread the
putty all over the surface so each hole is covered. I then dip my finger in the
fingernail polish remover and swipe it across the putty. This forces the putty
into the holes and produces a smooth finish on the kit. For hard to reach
places, I use a q-tip dipped in fingernail polish remover to smooth the putty.
What do you fill vinyl kits with?
- Vinyl kits are hollow and not very rigid. Therefore, they need to be filled
with some material to give them support. Vinyl is also very susceptible to heat
so if your kits get warm, the vinyl will expand and contract and you will have
a kit that sags. I mainly use plaster to fill my kits. In most figure kits, I
only fill the kit up to its waist. Any higher would be wasteful and could throw
off the balance of your kit. Now, let's suppose you have glued the feet onto a
kit, you fill the legs with plaster, and it starts running out of the seams
where the feet meet the legs. Well, this can be prevented very easily. Before I
fill a kit with plaster, I fill it with water. If I can see water dripping or
running out anywhere, I pour the water out and dry the kit. I then take
superglue and fill the leaky spot. I go back and fill the kit with water again.
I keep repeating this process until no more leaks are detected. I also pour the
plaster in stages. This ensures that the plaster is thoroughly dry throughout.
When the plaster is dry, the feet can be drilled for insertion of pins if you
plan on pinning it to a base. If weight is a factor, I will mix shredded
styrofoam into my plaster. This will make the kit less heavy. If I want the kit
to be heavier, I will mix bb's or lead weights into the plaster. Plaster isn't
the only thing you can use to fill vinyl. Sometimes when I am in a hurry, I
will fill a kit with resin because it will become solid in about five minutes.
The only drawbacks are - it is expensive, it is very messy. When the resin
cures, it becomes incredibly hot. This will cause the vinyl to soften so you
have to be careful to hold the vinyl in place until the resin hardens. When
working with resin, you should always wear protection (resin bonds to skin) and
you should have good ventilation. I would only recommend resin filling to the
pros. You can also use foam to fill your kits. There is a two-part foam called Mountains
In Minutes that is excellent. You just mix the two parts together
and pour the solution into your kit. The liquid will heat up and turn into
foam. This technique is also very messy. You should follow the same precautions
as pouring resin. You can also ruin a kit if the foam has nowhere to go in the
kit. It will keep expanding and warp the vinyl or split it. Always ventilate
the kit by cutting a small hole in a foot or something. Other filling material
includes newspaper, aluminum foil, five-minute epoxy, and two-part epoxy putty.
How do you make simple modifications to a resin figure?
For example, repositioning an arm.- For slight
re-poses, a hot-air gun works wonders. You just have to be careful and not get
in a hurry. If you hold it too close to the resin, the resin will scorch and
burn. So you must continually move the gun around. Once the resin is 'rubbery'
then bend it and hold it under cold, running water to set it instantly. This is
not a good technique for hollow-cast stuff as it may cave in on itself. For
major repositions, you will have to cut the resin and sculpt in the missing
parts.
What is the best way to mask a kit?
- To mask off areas of a kit that are impossible to mask with tape, I use
liquid latex mold builder. I got mine at a craft store called Michaels. This
stuff is great for masking those impossible areas (especially skin) but you
have to treat it with respect! Before you mask anything, make absolutely sure
that you have sealed your paintjob. I use Testors flat sealer. Apply the mask
as close to the area you are about to paint as you can. Put on a thick coat too
because it will be easier to peel off later. You can tell it is dry when it is
clear. When you peel it off, it usually leaves a rough edge that you will need
to touch up with a paintbrush. One more thing, don't leave the mask on for a
long time because it has discolored skin even though it was sealed. As soon as
it is dry, I paint the kit and then peel it off.
Is airbrushing the only preferable way to paint a model?
- Airbrushing is definitely not the only way to paint. I paint with a brush
whenever I can because for some reason, you feel 'closer' to the model when you
paint with a brush. I would say that a brush is the main
tool and the airbrush is a secondary one. Airbrushes are great for those 'soft'
paint gradations. Skin tones come to mind. I always use an airbrush for
painting skintones unless the area to be painted is small enough to be painted
with a brush. Basecoating is also a good job for an airbrush. I would much
rather spray a base coat on a kit than brush one one. Too many brushmarks occur
when I try to paint large areas with a brush. Plus, airbrushing is quick. Hand
painting basically consists of base coats, drybrushing, washes and detailing.
There is no way to paint eyelashes with an airbrush! When I paint a kit, I
usually end up using a little bit of every technique to achieve the final
result.
How do you photograph your kits?
- I have an el-cheapo 35mm camera with a set of diopter lenses. My setup
is as follows:
I have purchased a
Pache AirBrush double action and now what do I do?
- Well, hopefully you will start using it. I started out on a Badger
single-action airbrush spraying enamel paint. So, I got nice results, but not a
lot of flexibility. A double action or a single/double bastardization like my
Testors Modelmaster will give you much more control and a greater range of
spray patterns. (I currently use an Iwata Eclipse double-action and a Sotar
20/20 double action.)
I would say the most important thing is make sure your paint is thinned
properly. Too thin is much better than too thick because you will clog your
airbrush up if it is too thick. The consistency of milk is preferable.
I only shoot acrylic paint through my airbrush now and I use Polly-S airbrush
thinner. It doesn't produce as many airbubbles when I mix it.
I also use a Badger paint strainer. This is a cylindrical tube that slides over
your siphon tube on your airbrush. It catches all the little lumps in the paint
that you missed when mixing.
When using a double-action, remember pressing down delivers the air and pulling
back on the trigger produces paint. I always paint using a tapping motion on
the trigger and I keep the airbrush moving.
I also keep one of those large artists' sketchpads on my lap when I airbrush.
This is so I can spray the color on a white piece of paper and make sure it is
the right color and consistency. If the paint spatters, then it is too thick,
if it veins out everywhere, then it is too thin.
After you feel comfortable painting on paper, then start painting your kits!
You could start out painting basecoats on your figures. When you are
comfortable painting three-dimensional figures with solid colors, then practice
fine lines and detail your kits with shadows and highlights.
I was wondering if you could give me a few tips on
painting the Predator's skin. - When I painted that
Predator, I kept thinking frog skin. It actually turned out looking like fish
skin to me, but I am still pleased with the results. If I remember correctly, I
basecoated him with a mixture of hooker's green, raw sienna, and white. White
is the most prominent color, so he will look white but not a bright white. I
then took a dark brown and airbrushed it into all the folds and creases on his
skin. I misted it around the bony 'crown' on his head and the very top of his
head. I then took straight flat black and sprayed that into the creases making
sure that the brown was still visible on either side of the black. I airbrushed
his eye sockets with black too. I then took a fine-tipped brush and painted
black dots of differing sizes all over his body. I kept them random, but made
the dots more concentrated around the folds of his skin. I also made the dots
resemble a 'V' on top of his head. I then took brown and made some dots but not
as many as the black. All of the little quills on his chest, shoulders, and
head were painted with black. Other than the netting, the rest was a piece of
cake. Basecoat the armor with black and drybrush it with steel. (I
have since heard that Steve Wang himself said that he was going for an
over-ripe bananna color on the Predator. Visit his webpage at
Death Studios for excellent reference photos.)
I recently acquired two old
aurora build-ups and would like to de-glue them. Have you heard of anything
that
removes that old nasty tube glue from otherwise perfect models?
- Old model glue can be removed with paint thinner. It has to be 100% pure
mineral
spirits thinner. Any other kind will not work. Cut the thinner with a little
water so it will not be as strong and submerge the glued areas in it. You must
be careful not to leave the parts in too long because the plastic WILL melt
after awhile. Especially the glow parts. I would suggest five minutes maximum.
Take the part out and try to pull it apart. You may use a knife to pry along
the seams. If it will not separate, then submerge the part and try again.
Take your time and work on little areas at a time so the plastic will not
weaken any more than need be. After the parts are separated, wash them in
soapy, cold water and let them dry thoroughly. If the parts are glued with
superglue, use superglue remover.
How do you paint the lips on a male figure?
- Male lips are never red! Well, most are not. To paint a man's lips, I use my
darkest flesh color and mix in just a small touch of burgandy. You might want
to thin your paint, so you apply thin washes of paint to the lips. When they
are dark enough, stop applying the washes and seal the paint. You also do not
want to seal the lips with gloss. Any kind of a flat or satin sealer will do.
I had a question about one quote, "Finally, I seal the
kit with Testors flat." I tried doing this with my first garage kit, a
Rhedosaurus diorama from "Beast from 20,000 Fathoms," and the acrylic I
was painting over just melted. - I always use
Testors in a spraycan. Flat is the black can with the yellow stripe around it.
I use the spray because the flat 'softens' the paint and you can ruin a perfect
paintjob if you touch it. I have sprayed my kits with it and I sometimes find a
speck of lint or something on the kit. When I try to get the lint up, I almost
always smear the paint. In other words, spray it and leave it alone until the
testors is dry. I would never brush this stuff on. Testors makes an excellent
acrylic flat sealer that I doapply with a brush or thin it and spray
it thru my airbrush. Same goes for gloss, although I prefer Tamiya gloss over
Testors. (Testors clear sealer can be found wherever model cars are sold.)
What is the exact name of the liquid latex mold builder
that you get from Michaels? - It is called Mold
Builder Liquid Latex Rubber. It is made by ETI. I have a small plastic
jar of the stuff (16 oz) that I found at Michaels, but here is ETI's address:
Fields Landing, CA 95537 Phone: (707) 443-9323
How can you achieve a 'drool' effect for aliens and
other creatures? - Why do aliens drool so much?
About the easiest way to create drool is to use 5-minute epoxy. This is a
two-part glue that hardens when the two parts are mixed together. Mix the two
parts and use a toothpick to pick some up. Smear it all over your alien's chin
or wherever and let it drip off. Keep repeating this procedure and you will
eventually have an 'icicle' of drool because the glue hardens quickly and it is
clear. The only drawback is that the epoxy turns a yellow color after about a
year. If you look at my
Halcyon Alien I, you can see the epoxy technique. A better
technique would be to use clear casting resin. You can usually find the two
cans of plastic and hardener at craft stores. This resin sets up in about 15-20
minutes, so you have to be more patient. Or, you can speed up the process by
adding more hardener to the mix. Be careful though because the chemical
reaction will generate heat and could melt your kit or even burn you! Do not
mix up too much either. Apply the drool in thin pours and you do not generate
as much heat. To direct drool in a certain direction, attach clear fishing line
to your kit and apply the resin or epoxy for long trails of drool. Because the
line is clear, it will disappear when the drool is over it! Artists inks can be
added to the resin to simulate blood also.
How did you paint Cutey Honey?
- Go here - CUTEY
HONEYto see my complete how-to article.
What particular kind of paintbrushes would one use to
paint Anime eyes?- As far as brushes go, get an
18/0 brush for eyes. The tip is very small. If you can't find one of those, get
a 10/0 brush. It is a little fatter, but the tip is still very small. When you
paint the eyes, it is better to put down many layers of thin paint. If you get
it
too thick, you will see brush marks. Especially in the whites of the eyes. For
the rest of the body, any wide, flat brush will do. I buy the ones that also
have about a 45 degree cut to them so you can get in hard-to-reach places. As
far as brands, I get the fat ones at Wal-Mart. They are 3/8 brushes by Robert
Simmons with the light blue handles. The smaller ones I get at Michael's when
they have them. I bought 4 the other day because they are hard to find. The
brush is called a 18/0 Loew-Cornell spotter.
This is in regards to dry brushing a model. What type of
paint works best for you? Do you use a special brush?
- I only use acrylics when I drybrush. Unless I am creating metallic
looks. Then I drybrush with enamels. I hardly ever drybrush with
Tamiya paint because it dries too quickly. I also use a wide, flat
brush that is pretty much ruined. This is because you have to be pretty
heavy-handed when drybrushing. Make sure that you have as little paint
on the brush as possible and pull the brush across the detail so that it
will pick up the paint. If you 'go with the grain' then the paint has
nothing to stick to. Drybrushing is also a lengthy process and most
people try to get the job done in one pass. Sometimes you have to build
up layers to create a pleasing finish. Another trick is to go back in
with an airbrush and smooth everything out. For example, I drybrushed
the pants on my Female Romulan with lighter shades of gray. Because her
pants were slightly 'rough', the drybrushing looked unnatural. I mixed
up a darker shade of gray and airbrushed in the folds and creases of the
pants and this blended everything together. If you can't get a drybrush
session to work, try going from light to dark by painting the lighter
color first and giving the area a wash with a darker color. Remember,
drybrushing is a dark to light process. One more thing, your brush
should be 'poofy' almost like a powderpuff to produce good results.
Stiff bristled brushes usually don't work very well.
How do you avoid a re-cast kit by just looking at it?
- There is no easy way. Just be familiar with the originals. Ask someone else
if they have the kit or have seen it. The color of the resin is a big tip-off.
If the box says 'Elfin' or 'Phantom' then it is a recast.
If the box is black with no writing and a photo pasted on it, it is
probably a recast. If the instructions look photocopied, it might be a
recast. I had the same problem with a kit I was about to get and I
asked people on the gremlins mailing list to describe the kit to me and
by their descriptions, I was able to tell that it was an original. Go to my
'links' page for a definition of a re-cast kit.
How do you do washes?-
When you wash a kit, it is a dark on light technique. You slosh the stuff on
and it fills the deeper recesses leaving the higher areas their original color
- almost. Higher areas will be slightly stained but there are ways to avoid
this if you want. I make a wash by mixing acrylic paint up to a watery
consistency with Polly-S airbrush thinner. You can use water, but it seems to
'flow' better with the thinner. If you have a large area to cover, you have to
be quick because the wash will pool up and dry leaving rings of paint. Brush
the wash on with a wide, flat brush and keep it moving until you are satisfied.
I sometimes take a damp paper towel and blot the excess wash up. Once the wash
is dry, you can go back and drybrush a lighter color on to pick up the
highlights. I think stone effects are better with washes.
What is the best way to get a spatter effect?
- When you want to simulate a starfield or just a good-ole arterial spray, use
an old toothbrush. Dip the bristles in the paint, point the brush at the model,
and rake your thumb across the bristles. I wanted my
aliento look like he just ripped the jugular out of someone, but I
didn't want to over-do the gore. The spatter effect across the floor did just
the trick.
Can you please offer any direction on paint mixtures for
nipples on girl kits?- I use my blush shade for
nipples. It is made by mixing red oxide (Liquitex rust-red color) with my
medium skin color to lighten it up. I make it pretty thin and airbrush it on.
Sometimes I will go back with a brush and brush this thinned down mixture on.
Because the way the paint pools up, it will leave a darker outline. If you are
using an airbrush and you think they are too dark, you can mist the skin color
over them to
tone them down.
What kinds of tools do you use for "phisically altering"
your kits? Is there a special tool for getting around those curvy parts and
keep them smooth?- When altering kits, I use
anything I can find. If you have a small gap to fill, use Squadran putty and
then use fingernail polish remover to smooth it out. You can use a q-tip if it
is in a hard-to-reach place. Once it is dry, use fine grit sandpaper to smooth
it further. Testors makes some really good sanding sheets. For heavy duty
sanding, use files or a dremel tool to remove the excess material. I rarely use
files though. I start out with the dremel tool and then switch to a heavy grit
sandpaper and then finish up with the fine grit stuff.
I would like to do her (Maria robot from Metropolis) in
a silver metallic finish. I would like to get her to look like she is really
made out of metal. Do you have any suggestions as to how best to acheive such
an effect?-
The best way to achieve a metallic finish is to use enamel silver paint. I use
Testor's chrome. Basecoat your kit in flat black and seal it with a clear flat
sealer like Testors flat. If your kit is made out of resin, use a wide, flat
brush to drybrush the silver on. You do this by dipping the brush in the paint
and wiping most of it off with a papertowel. You then rake the 'dry' brush
across the kit. The raised areas will pick up the paint leaving the indentions
and creases dark. You get a really good contrast with this technique. Continue
drybrushing until you get the sheen you desire. Don't over-do it or you will
obliterate the shadows. If you do over-do it, go back with a fine-tipped brush
and paint the black areas back in. If your kit is vinyl, basecoat it at least
twice and seal it at least twice because enamel paints will not dry on vinyl.
If you create a sufficient barrier with your acrylic paint, you should be fine.
Use caution though. I basecoated pieces of my Judge Anderson kit with acrylic
paint and drybrushed gold enamel over them. They still feel tacky to this day!
Do you use the Liquitex bottle paints?
- I use many different types of paint. I did use the tube type paint until I
found the bottles of Liquitex. They are basically the same. Liquitex is a good
quality paint that has a good 'bite'. This means it
adheres to your model well. The craft type of paint is good as well,
but you can scrape the dried paint off with your fingernail. This is
irrelevent though because I seal and protect all paint with a clear
gloss or dull coat. I have recently discovered Freak Flex and they are
excellent paints. They make airbrushing easy because they are pre-mixed
for that purpose. The only drawback is you can't really drybrush with
them because they are so thin. I use Freak Flex alone for airbrushing
skintones now. I will mix in some Liquitex Red Oxide for my blush shade
though.
Just wanted to ask a question about painting skin tone
with Freak Flex paints and what colour process you use.
- Painting skintones with Freak Flex paint is a slightly different process
than painting with Liquitex. This is what I do. Keep in mind that I am
still learning this method of painting as well. I basecoat the kit with
tan flesh. I then lightly go over the raised areas with pale flesh. I
then spray in all the shadows with a creamy-brown color created by
mixing suntan flesh and brown. I do another highlight spray with pale
flesh. I then spray the blush shade by mixing Liquitex Red Oxide in
with the pale flesh. Finally, I lighten straight pale flesh with white
and hit the highest areas. I think the new Freak Flex colors designed
by David Fisher may have a better blush shade.
I just got a cold cast porcelain kit and since I've
never made one I wanted to know what things I should consider when I'm making
one, (i.e. extra steps)?- Cold cast porcelain
can be a a joy and a pain at the same time. If the sculpture is cast correctly,
there should be minimal to no seamlines to sand. If you have to sand, it is
similiar to sanding concrete. I go over most cold-cast porcelain seams with a
'soft' dremel tool bit to take some of the time out of sanding. For really bad
seams, I recommend filling them with putty first. Cold cast porcelain can also
very brittle. Exercise extreme caution when drilling or handling smaller parts.
On a brighter side, cold cast porcelain rarely needs to be washed before
priming. Although I wash mine anyway to remove all the oil and dirt that came
from me handling the kit while assembling it. It also takes to superglue very
well. I
have broken the porcelain on a joining piece before I broke the glue
bond. I suppose the cold cast porcelain is porous to an extent allowing
the glue to really 'bite' into it. Other than those things, treat it like you
would any other resin kit.
What is the best way to get rid of the mold lines? Will
using a Dremel tool help?- A dremel tool is
absoutely necessary for resin kits. I use mine all
the time. I have an old bit for mine that's slightly dulled down from use. It
sands seams off to a smooth finish. The finer bits can be used to erase
mold lines in hair and other detailed areas. I do however, use an
exacto knife and sandpaper whenever I can (not as messy). Dremel tools
can create a lot of resin dust, so you need to be in a well-ventilated
area. I also use my dremel to cut the heads off of nails so they can be
used for pinning resin pieces together.
In some pieces, I find the 2 pieces of resin that were
joined in the
manufacturing process a little misaligned. - The
modeler's worst nightmare. You will basically have to 'resculpt' to make the
sides match. Use an exacto knife to start cutting down one
side of the belt to match the other. Then, use some putty (I use
Magic
Sculp) to build the bottom of the belt down to
match the other side.
I really liked your paint job on the Batman Forever kit.
Can you tell me how you went about painting it? Like what colors you used and
some of the techniques you used?- Start out with
black. Drybrush him with gunmetal acrylic paint. Get some 'craft' paint at
Wal-mart or a craft store. It comes in the small, cylindrical bottles. I used a
pale, metallic blue color. Mix this with the gunmetal to lighten it and
drybrush again. The paint should only stick to the raised areas. Slowly lighten
the paint with silver and drybrush again until you get the desired effect.
Lastly, I took a fine-tipped brush and outlined all the panels and lines with
black paint. Takes a steady hand for this and is a pain, but worth the results.
I'm about to start painting a stone base for
Frankenstein and I'd like to know if you can give me any tips on how to
approach that.- I get the best stone finishes
with washes. This is because the wash can leave natural-looking streaks and
imperfections
in the finish. I basecoat the stone with a light gray color. I then mix up a
wash of black by watering down black paint with Polly-S airbrush thinner. Water
works also. I will then brush the stuff on and
let it flow into all the creases and crevaces. I then take a papertowel and
blot the excess. I get pretty rough with the papertowl blotting. Another
technique is to let the wash pool on the stone for about 30 seconds. I will
THEN blot it and what will happen is there will be a dark ring left where the
stain was. Do this a few times and let them overlap and you will have some good
stone. If it is a rough stone
texture, I will sometimes drybrush lighter grays over the highest points.
I have a vinyl pre-paint from Japan. Should I strip it
to re-paint or just primer over the kit and start from there?
- I would say that unless the paint was obscuring detail already because it was
thick, then I wouldn't worry about it. If the paint is slick, then I would MIST
it with a light gray primer. I use The Armory spray primer and it is
wonderful. I shy away from stripping vinyl figures because I worry about
harming the vinyl.
How do you paint blonde hair?
- I get asked this question a lot. This is how I do it most of the time. I will basecoat the
hair with Raw Sienna. Once that is dry, I start mixing in Yellow Oxide and slowly drybrush the
color up. If I've overdone the drybrushing, I'll give the hair a light wash of Burnt Sienna.
For a platinum blonde, I basecoat with tan and then do the yellow oxide thing with
the final step mixing in a bit of white to lighten up the mix. I've read that you can basecoat
with a light green and work your way up, but I have yet to try this. I have also read that you
can top off the color with a LIGHT drybrushing of silver. Or was it gold? Anyway, this is
another technique I have yet to try.
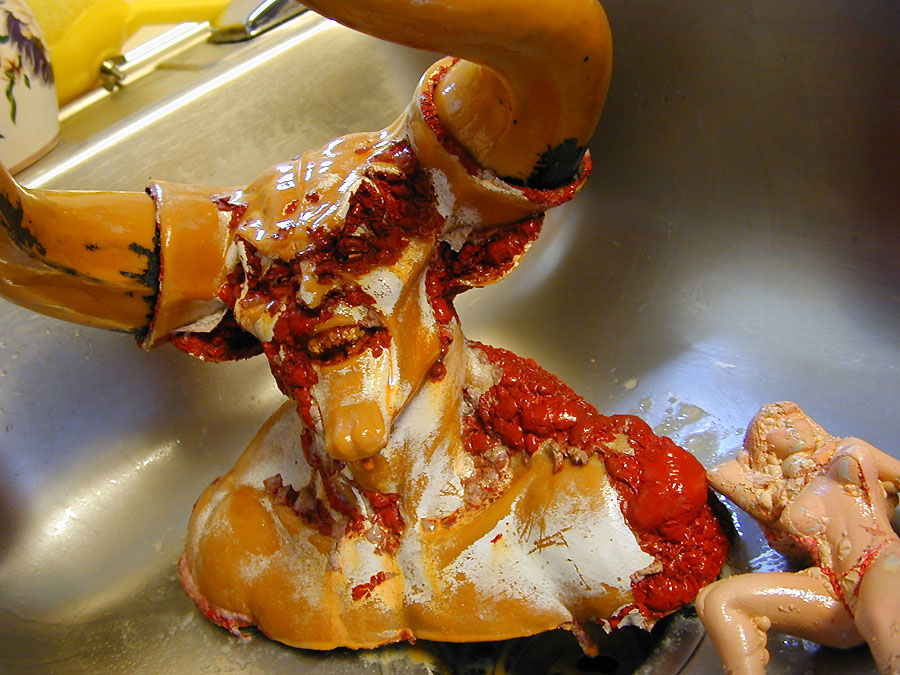
Want to strip a kit and start over? Here's how.
- If you have a kit with an existing paintjob that sucks, you can strip it and start over. I
have tried Easyoff Oven Cleaner and, yes it works, but it SUCKS. The fumes alone are enough to
turn me away. I recommend a product called DEEP DOWN STAIN STRIPPER. I found it at Home Depot
in the paint section. It comes in a red spray can and it is called stain stripper because it
is used for stripping the stain and varnish off of wooden items. On resin, it starts to work
almost immediately and NO FUMES. I haven't tried it on vinyl yet, so you're on your own there.
But for resin, it's teriffic! Here's a pic of it in action:
Strip Away!
Can you paint my kit for me?
- Back in the good ole' days, I had plenty of free time on my hands and I could paint pretty
much anything people threw at me. Sadly, those days are over and my time is extremely limited now.
Don't believe me? Look at the number of updates on this site. That should tell you something :)
However, I will work with you if you a) Don't expect me to paint a kit for fifty bucks, and b) Don't
mind waiting a while for your kit to be finished.
What is the difference between resin kits, vinyl, styrene? What are the benefits of each group?
- Ah, the different types of model kits. I suppose the majority of us start out with styrene, but that
isn't always the case. Just bear in mind that I am no expert on this stuff, so here's my take on
different modeling material. Styrene is plastic. Ususally mass produced by bigger companies for the
average Wal-Mart modeler. Car kits are a good example. There are usually more pieces which means more
seams to fill. You also have to use model cement which chemically melts the pieces together. Usually not
a lot of detail in styrene kits, but Halcyon proved that you can make excellent kits from styrene. And styrene
kits are very cheap relatively speaking. Polar Lights is a company that still produces styrene figure kits.
Resin is plastic also. However, resin kits originated in garages around the world. Garages that can't afford
all the expensive equipment it takes to make a styrene kit. So, most resin kits are solid cast. Some of the
pros have rotocast machines that will sling the mold around so you end up with a hollow kit. Resin kits usually
need to be cleaned up because moldmaking isn't an exact science. Molds not correctly lined up produce kits with
offset mold lines. To much moisture, and you have air bubbles, resin warts. Molds break down over time resulting
in lousy castings. But, resin kits are easy to work with. The resin is soft enough to be easily sanded and shaped.
Resin is tough. It can stand up to most any paint or glue. Resin kits can be easily 'pinned'. By this, I mean
kits' joints can be strengthened by inserting small metal pins during assembly (nails, coathanger wire, etc...).
Vinyl kits are hollow. The casting process is more involved and expensive. Vinyl kits will hardly ever have
offset moldlines. They are easy to prep. Just trim off the excess vinyl and assemble with superglue. They can
be unstable because they are hollow. You should fill vinyl kits for stability. I use plaster or resin. Some
people use foam, but I find this way too messy. Vinyl kits are a little picky when it comes to paint. Enamal
paint will never dry on a vinyl kit!
I goofed and painted my vinyl kit with enamel paint. Is there any way to save it?
- If you don't want to start over, here's a trick you can try, but I make no guarantees that it will work.
Fill a garbage bag with a bag of cornstarch. Insert your kit into the bag, tie the bag off and shake it vigorously.
The cornstarch will leach all the moisture out and you should end up with a dry kit after about a week. I know because
my tried this with my vinyl alien kit. It didn't seem to fade or distort the paint any, so who knows? It may work
for you too!
I have the alien 3 cold cast kit by dark horse. Parts of the kit, especially areas
with high detailing seem to be coated with a very fine, whitish, grainyness. I was thinking that
there is a possibility the stuff could loosen after painting, causing the finish to become come off...
- Hmmmmm. I'll have to look at mine. I have seen another and I don't remember any 'grain'. This may be some by-product
of a later casting? Here's a description of the process from moorecreation's site:
-Cold-cast porcelain is actually resin mixed with porcelain powder. It is very strong and resistant to damage, but has
the texture and feel of porcelain. A mold is taken in rubber off the original and the liquid resin-porcelain casting material
is poured into the mold which then hardens and is removed. This procedure allows the sculpture to have much more detail and
undercuts than a traditional ceramic because the rubber mold is flexible and will pull away from the casting. True porcelain
is not cast in a rubber mold because the rubber would not allow the casting to breathe (and thus dry) so it would never harden.
The casting is then filed, sanded and painted for retail sale.
It definitely doesn't sound right because you'd think the alien should be smooth. I would give it a good soapy wash with
a toothbrush. Then prime it. Once the primer is dry, rub the areas with your finger. If the primer doesn't come off,
I'd say you are safe. If it does, maybe you could brush the kit with a fine wire brush to remove the 'powder'.
Hey man, I just HAVE to know, how did you paint the eyes of the beach blanket beastie?
How did you make that mottled look on the eyes? I could do that on a large kit with an airbrush but how do you do it on such a small kit?
- I used a very tiny airbrush. Ha! Actually, I basecoated the eyes with a light green and then took a paintbrush with a very small tip
(18/0) and stippled in tiny dots. The first layer of dots was made with an off-white wash so that they were slightly transparent.
That was followed up with a series of black dots being sure to paint fewer of them. A white slit for a pupil and then a slightly black one and the beast can see!
I'm painting a predator bust and I want to do a wash on the wrinkles to bring them out.
I don't know if I should wash or use a glaze.
- A wash is a more subtle approach because it is thin. Thinner = more translucency. A glaze is a more heavy-handed approach
because Thicker = more opaque. A wash will not only highlight the wrinkles, but it could slightly stain the areas around the
wrinkles. If this isn't a problem, then great, go for it. Or, you could try applying and then wiping with a papertowel or
cotton swab, but since a wash is thin, you will most likely wipe it out of the wrinkles as well! This is why glazes are used.
Because the glaze is thicker, you can wipe and it will stay in the recessed areas. Even though a glaze is thick, it won't obscure detail. If it does, wipe it off with a wet paintbrush and start
over with a slightly thinner mixture. Also make sure you seal the paint well before a glaze or it could stain the paint like
a wash would. It will also protect the paint when you wipe the glaze off.
_____
|_____
_____|
|_____
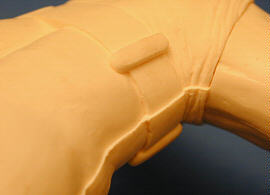
Other examples of bad seams:

- Three blue photo floods - fancy name for a 5 dollar lightbulb that
simulates
natural sunlight. One hangs from above, the other two are on the left
and right of the model.
- One white sheet - but I also have a big piece of black velvet from
Wal-Mart, and a big piece of gray fabric (also from Wal-Mart) Black is
nice, but 'touchy.' You tend to get pictures that have a lot of contrast to
them with a black background. I have used the white background the most.
-
One gray card. This is a piece of cardboard that you buy at a camera
store. You set it where you will be photographing your kit, get your
light meter centered by focusing on the card and setting the shutter
speed, and take a picture of it. From then on, take pictures of the kits
without making any more adjustments to your camera except for focus.
I believe the people at photo place use the gray card to 'calibrate' their
machine
so the colors come out correctly.
- One 35mm camera with one of those little push-button wire thingies that
screws on (so you don't bump the camera when you push the button). I
always run the f-stop up to 22 to achieve the greatest depth of field. I then
center the little light meter by adjusting the shutter speed(this usually
results in a really 'slow' shutter speed - not a fast click, but a slow one -
that's why you DON'T want to bump the camera). I use 100 speed film. It has a
finer grain
so you get more detail. If you use the blue photofloods, you probably
need a blue filter for your camera. Don't ask me why, it just makes the
colors come out right. Trust me, Fisher uses one. He has a Hoya 82a
filter, mine is made by another company (but still the same 82a).
When focusing, I always focus on what the camera is centered on. For
example, if the center of the shot was on a chick's bellybutton, I would
focus on that even though her outstretched hand may appear out of
focus. The f-stop will take care of this and everything will be in
focus in the final picture.
For extreme closeups, I have a set of three diopter (magnifying) lenses
(4X, 2X, 1X) These just screw on. Once again, if using the blue filter, put the
diopter lens on first, then the filter. The filter always comes last. A macro
lens may do all this for you, but it is a heck of a lot cheaper to get diopter
lenses.
Poor Moderate Excellent Flexibility, custimization: Styrene Vinyl Resin Cost: Resin Vinyl Styrene Availability: Vinyl Styrene Resin
Any questions can be directed to: me
![]()